This article outlines my main steps in constructing a digital “rose window”.
Medieval rose windows, like all parts of medieval cathedrals (and, indeed, like most places of worship going back as far as the temples of ancient Egypt) were constructed using “sacred geometry” to lay them out. This consists of geometric constructions of various kinds which provide a number of lines and points on the surface which one can use in one’s design (rather than just a grid of equal measurements, which is what tends to be used in modern designs). There is always a lot more geometry in the planning stages than in the final design, so “sacred geometry” has three levels: the “hidden” geometry of the construction lines, the “manifest” geometry of the visible design, and the symbolism of the numbers embedded in both of these.
First, I took my digital camera (an ordinary 4-megapixel Nikon Coolpix, not an expensive professional device) to the free, public Parnell Rose Gardens on a nice day when the roses were in bloom. I had a pleasant time taking a few dozen photos to act as “stock”.
Some time later, when I had the time, I pulled out the old copies of CorelDraw and Corel PhotoPaint which I had bought for $70 on the TradeMe auction site. You could equally well use different programs, such as Adobe Illustrator and Photoshop if you have them, or for free alternatives Inkscape and The Gimp. I find the Corel products slightly easier to use than the free ones (though they are probably not as easy as the very expensive Adobe programs, or for that matter more up-to-date Corel ones).
I Googled “rose window geometry” and found some helpful stuff. This website helped me construct the outer part of the window, based on the west window at Chartres Cathedral, while this website gave me the idea for the central pattern (adapted somewhat from the pattern given there, which seems to make the central circle an arbitrary size).
Stage 1: Dodecagon
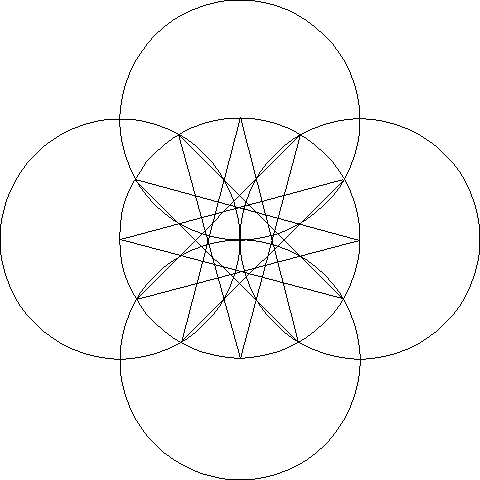
The first stage of my construction, once I had defined the centre of the page using guidelines, was to set up the twelve-pointed star (dodecagon) which is the basis for most of the layout. I drew an arbitrarily-sized starting circle at the centre of the page, then used the Duplicate tool to produce four more circles the same size and moved them so that they met at the centre. These, plus the centred horizontal and vertical guidelines, define the points on the original circle’s circumference which are the points of the star:
Stage 2: Outer Circles and Guidelines
The next stage was to place twelve small circles nesting in the arms of the star. I also, for ease of reference, ran guidelines through the twelve points of the star (these don’t come through when I export to GIF):
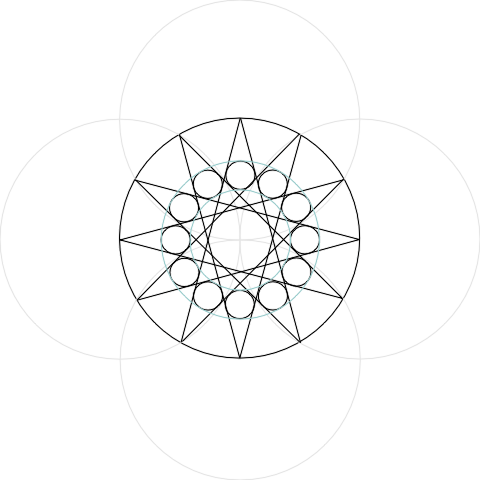
I have started here to use different colours to distinguish the lines from each other so that the whole thing is easier to read. Later on I separated the construction lines onto their own layer in the drawing so that I could hide them to get an idea of what the final piece would look like.
The blue-green circles above are not actually construction lines as such. I drew them to check that all my circles were properly aligned with each other. In CorelDraw, you can draw a circle from a defined centre (such as the crossing point of the construction circles) by holding down Shift and Ctrl while you click and drag from that centre. The other programs I mentioned have similar capabilities. A hint: it is a good idea to turn on “snap to guidelines”, since this will help to get your circle’s centre aligned with the centre of the design. Consult your program’s Help to find out how to do this.
Stage 3: Inner Dodecagon and Outer Boundary
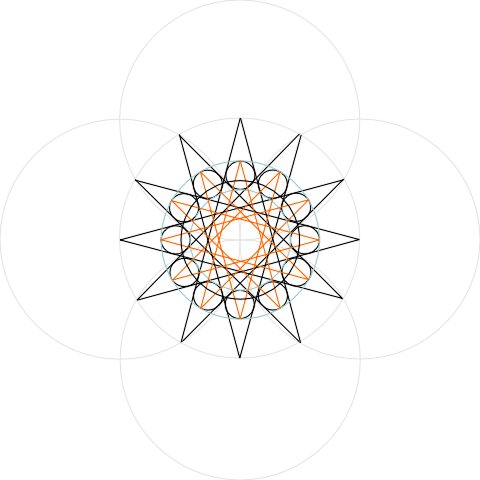
I then drew another dodecagon inside the circle defined by the twelve smaller circles. I constructed an equilateral triangle (out of guidelines) with the uppermost point coinciding with the uppermost point of the larger dodecagon, and within this triangle constructed a circle which cut the small circles. This will be the actual outer edge of the window, the constructive geometry of which therefore extends outside its boundaries. I then (on my “shapes” layer) duplicated the twelve small circles and erased everything outside this boundary. (To erase parts of circles in CorelDraw you have to convert them to curves and then deselect the tick in their properties that says they are closed shapes.)
Stage 4: Squares and Trefoils
Where the dodecagons cross each other they form squares, which are the next part of the design. A few of my construction lines got accidentally moved, as you can see (a drawback to digital work that you don’t get on paper):
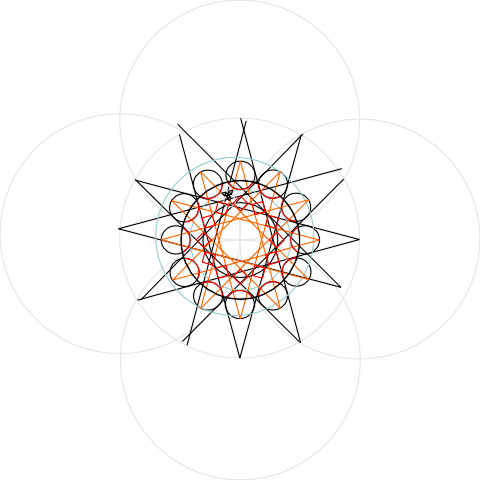
I substituted trefoils for the quatrefoils in the Chartres window, using the helpful little book Sacred Geometry by Miranda Lundy (Wooden Books, 1998) to find out how to construct them. I used the intersections of the inner dodecagon (shown in orange above) to get the initial (outer) triangle:
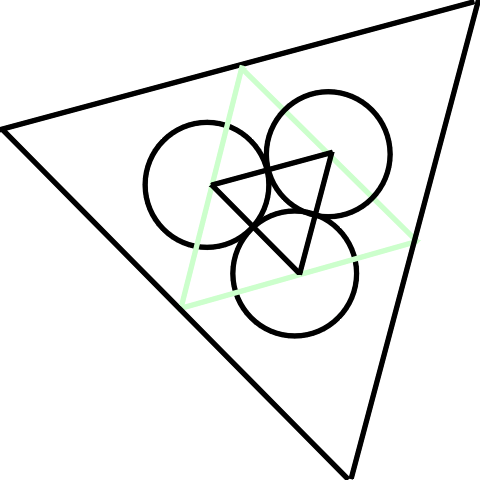
From the point illustrated above, you just erase the parts of the circles that are within the innermost triangle and hide the triangles, and you are left with a trefoil. Hint: A quick way to make an equilateral triangle is to draw the first side, create a duplicate rotated 120 degrees, and then create a duplicate of that rotated a further 120 degrees. Then move the sides so that the vertices (corners) touch each other.
Once I had one trefoil, I created rotated duplicates (there are twelve, so each one is rotated 30 degrees from the previous one) and moved them to the appropriate points on the design. To make sure I had them in the right place I drew a couple of circles, a yellow one through the centres and a green one around the outside of the band of trefoils (the yellow one wasn’t needed, actually):

Stage 5: Inner Circles
I now drew a series of shapes to give me the central figures. First, a circle passing through some of the inner crossing points of the orange dodecagon. Within this, I constructed a hexagon and (using guidelines, so you can’t see it) a square. I discovered, interestingly, that if I drew twelve circles with centre points on the circle constructed within the square, such that they each took up a twelfth of the circle (based on the twelve equally spaced guidelines), they also fitted exactly inside the hexagon. There is no doubt a clever mathematical proof of why this is, but I will leave that as an exercise for the reader:

I erased the parts of the circles inside the inner circle:

I then used one of the standard step-down methods of getting a smaller circle with a harmonious relationship to the larger one, namely, drew a square in the larger circle (with guidelines) and a circle in that square. Then I did the hexagon/square/twelve circles maneuver again at the smaller size:

Here is the completed drawing, with construction lines removed:

Once I had the drawing, I switched over to PhotoPaint. Inserting the photos was relatively straightforward, just a matter of selecting part of the drawing and pasting the appropriate photo (or part of it) into the selection. It took a while, partly because I wasn’t totally familiar with the tools and at one point locked a layer accidentally, which prevented pasting into that layer. But apart from this it went fairly easily.
Here is the final result (a larger version can be seen here):

I’m not a trained artist or even much of a geometer – I can just about follow the proofs in Robert Lawlor’s fascinating book Sacred Geometry (Thames and Hudson, 1982) if I concentrate hard, but I prefer Miranda Lundy’s simple diagrams to help me do constructions. (If you can’t get hold of either book, try Euclid and Archimedes for ideas about geometric constructions, or Google for tutorials on sacred geometry. I have also written an article on Digital Sacred Geometry myself.) I created this piece using inexpensive tools which I taught myself to use, and photos I took myself. There are free tools, and even free stock photographs, available to everyone on the Internet. There’s no reason why, with some patience and imagination, you couldn’t do something like this too.
(Originally written in 2006)
Mike Reeves-McMillan lives in Auckland, New Zealand, the setting of his Auckland Allies contemporary urban fantasy series; and also in his head, where the weather is more reliable, and there are a lot more wizards. He also writes the Gryphon Clerks series (steampunk/magepunk), the Hand of the Trickster series (sword-and-sorcery heist capers), and short stories which have appeared in venues such as Compelling Science Fiction and Cosmic Roots and Eldritch Shores.


This is delightful. Thank you.
I’m currently working my way through Andrew Sutton’s book on geometry, called Ruler and Compass from Wooden Books. A colleague of mine has Miranda Lundy’s book, currently, so I can’t work with that.
I am curious about how I would go about designing a whole building, and not just a rose window. Have you experimented with that at all, using programs like Google SketchUp or suchlike?
Thanks, Andrew. I have played briefly with SketchUp but didn’t get very far.
The Lawlor book is a good one for architecture. It has a number of diagrams of temples, churches etc. I would say that the basic principle is to do a floor plan based on one of the geometric proportions (rather than a grid, as modern architecture does), and the same with the height of the outer walls, placement of the inner walls and other features like doors, windows etc., and decoration.